
Featured on Hackaday and Fictiv Blog!
Yep, you heard it right. With all the craze surrounding cooking sous vide these days, it was only a matter of time before someone decided to venture using it outside of the culinary world. Turns out that someone also had a 3D printer, and you won’t believe what happened next!
Click-bait headlines aside, this post is quite lengthy and not everyone may have the patience to get through it all. Feel free to read the TL;DR below, or if you’re feeling inclined, follow along my adventure through the land of 3D printing, materials science, and modern cooking.
Measuring maximum force before material failure, recorded on an iPhone 6 at 240 fps.
The Short Version
Heat treatment was carried out on 3D printed parts using a temperature controlled water bath (aka sous vide) instead of being baked in an oven.
What the goal was:
- To determine if extra strength can be squeezed out of PLA filament by annealing the parts and testing how much force can be applied before the test piece breaks in half.
How it was tested:
- Printed some small test blocks (7mm x 7mm x 30mm)
- Submerged them in water at 70°C for 30 mins
- Half of the blocks cooled to room temperature in air (70°C to 18°C in < 10 mins), and the other half were regulated to cooled much slower (70°C to 18°C in > 4 hours)
- Applied a point load on the test block
- Recorded the maximum load before failure
What the results suggest:
- Using a temperature controlled water bath provides a more stable, uniform, and controllable heat source (so parts are less prone to warping from uneven heating)
- Annealing PLA yields an increase in mechanical strength under some circumstances
- Testing was fairly inconclusive due to the inconsistency/human error in rate of applied force
What the takeaways are:
- Annealing printed parts by sous vide is a plausible method for annealing PLA
- Further testing is required to conclusively determine the balance between post-processing time and the resulting performance gains
The Long Version
Let’s say we wanted to make a highly functional part using a 3D printer. Maybe you need a replacement gear or a weight-bearing mounting bracket, and 3D printing would be the easiest way to fabricate the part.
You carefully select your slicer settings to optimize shell thickness, infill density, and layer height based on your application. You select a material that adequately suits your needs based on material strength or flexibility and environmental factors like UV exposure and heat resistance. You even take layer geometry into consideration to maximize strength in the loading direction.

Optimal layer orientation with respect to direction of primary load.
With all settings configured and high hopes for success, you load up the filament and hit “PRINT”. Hours later and your part is complete and, giddy with excitement, you pop it off the printer bed and finally test the part.
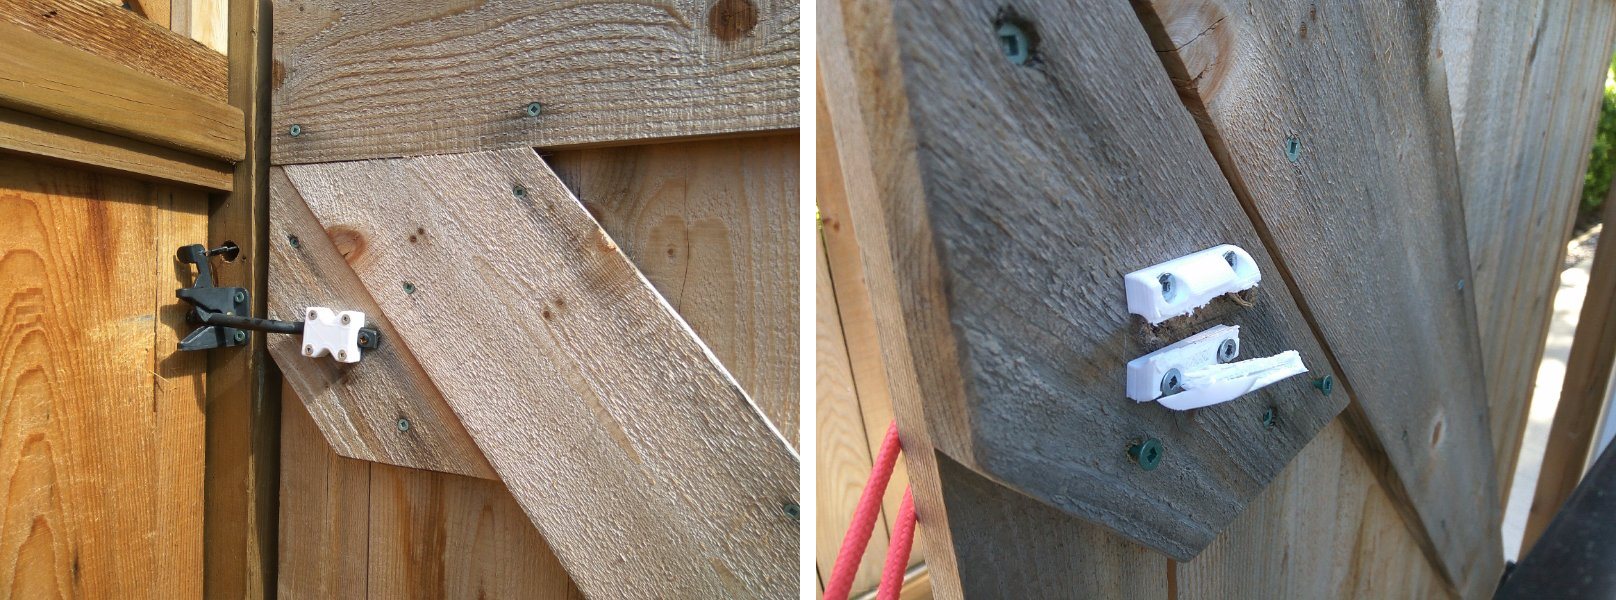
Fence bracket repaired (left), and broken after a heavy windstorm (right).
But it still fails. Tears ensue. Aspirations crumble. Is there any hope for the humanity of functional, home-made, plastic designs?
The Problem With Printed Parts
3D printing shines in the rapid creation of designs with moderately complex geometries. From trinkets to tool holders and enclosures to gear trains, 3D printing has found its way into a variety of purposes. However, at the end of the day, they’re only plastic parts having limited practicality in more demanding applications.
The inherent property of these parts is that they’re built layer upon layer, with different areas being rapidly heated and cooled at different rates. This causes internal stresses and they end up acting like perforated lines that are prone to snapping apart.
Thankfully there’s an entire industry dedicated to squeezing every ounce of performance out of material properties, so that will be an adequate starting point. Let’s begin!
The Solution: Heat Treatment
In metallurgy (the study of physical and chemical behaviour of metallic elements), annealing is a heat treatment process that alters the material’s physical (and sometimes chemical) properties1. For common metals such as copper, steel, silver, and brass, the process looks something like:
- Heat material until glowing
- Maintain at desired (recrystallization) temperature
- Slowly let cool to room temperature
The Importance of Reducing Internal Stresses
Typically with any material, internal defects are evident (notably on a microscopic scale) and create internal stresses which weaken its overall strength. When creating metal parts, the initial metal-forming processes create these defects and as a result, the metal will crack under stress along these stress-forming juncture lines called “grains”.
To minimize the effect of these grains, annealing can be done to soften the material, relax the grain structures causing the internal stresses, and allow new, strain-free grains to form as replacements.2
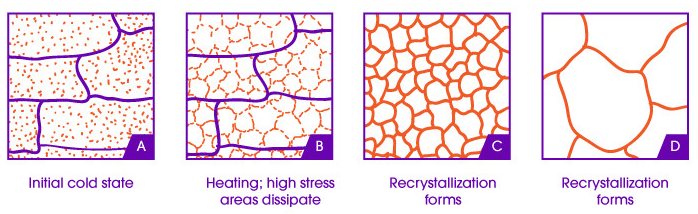
Diagram showing the effect of heat treatment on the material's microstructure. (Source: 3DSourced)
So to recap our newfound knowledge in maximizing material performance in metals:
- Internal stresses are bad
- Internal stresses are created when a material is pushed, squeezed, and formed into a part
- Internal stresses can be reduced by reheating, softening, and re-hardening the part
How does this relate to our 3D printed plastic?
With 3D printed parts, these internal defects occur on a more macroscopic scale. Plastic is heated, pushed through the extruder nozzle, and quickly cooled to form a layer of a printed part. Since plastic is poor conductor of heat, it cools unevenly and result in a mishmash of internal defects and grains. When an entire part is fabricated with this method, there’s really no surprise that parts usually break fairly easily! Each printed layer forms a juncture line of non-ideal bonding, and within each layer yields internal stresses due to rapid and uneven cooling.
A Review of Current Research
Fortunately, a similar heat treatment process can be applied to plastics to remove these nasty stresses and allow internal harmony to coalesce. I came across a research paper by Lih-Sheng Turng and Yottha Srithep, which discusses the relationship of crystallinity (ie. the degree of structural order in a solid) and mechanical properties of injection molded polylactide, commonly known as PLA3.
… Or, in plain English: they took a bunch of plastic sample pieces, performed some heat treatment on them, stuck them back in an oven to see if they still deform, and measured how much better the annealed samples hold up in the heat. Let’s dig in and see what they found!
The Nitty Gritty of Crystallinity
To go into a bit more detail, increasing a polymer’s crystallinity is good because it can lead to an increase in stiffness, strength, heat deflection temperature, and chemical resistance. However, this is difficult to do with PLA because of its low crystallization rate and its required slow cooling rate.
The Findings
The figure below shows the outcome of non-annealed (clear, first from bottom) and annealed (at varying temperatures and times) PLA test pieces. After heat treatment, they were placed in an oven to test their heat resistance. The annealed samples held up well in comparison with the non-annealed sample, suggesting that post-molding heat treatment results in better heat resistance and potentially mechanical performance as well.
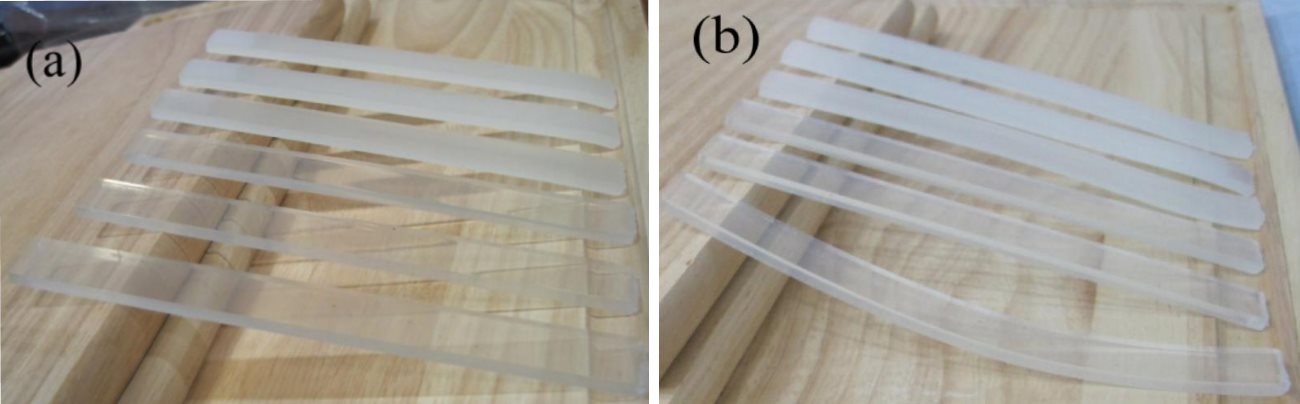
The first sample (non-annealed) had the lowest degree of crystallinity and highest deformation at 65°C. (Source: Turng and Srithep, 2014)
Looking at the graph below, we see that the PLA samples had a maximum crystallinity of about 49%. Maintaining the oven/annealing temperature at 80°C led to the fastest rate of crystallization, whereas 65°C had the slowest rate.

Degree of crystallinity versus annealing time. (Source: Turng and Srithep, 2014)
This shows that maximum crystallinity can be achieved even at lower temperatures, as long as the material is given enough time to sufficiently undergo recrystallization.
The Takeaway
Unfortunately, this paper only tested the heat resistance of the annealed samples, as it would have been interesting to see them evaluate other mechanical properties such as tension/compression and getting a stress/strain curve out of it all. But this at least sheds some insight on performing heat treatment on PLA; if it improves heat resistance, then it should also improve other (potentially related) mechanical properties.
A Review of Current Methods
From a cursory search in the 3D printing community, annealing PLA seems to be a common, known method in squeezing a bit of extra mechanical performance out of printed parts. YouTubers Thomas Sanlader4 and Joe Mike Terranella5 have shown both quantitative and qualitative results in strength improvements by annealing.
The Oven Bake Method
Thomas' approach in testing oven-baked samples was nicely scientific, and warping was shown to be an issue since ovens aren’t great at providing even, uniform heating.
Annealing various 3D printed plastics in an oven. (Source: Thomas Sanlader, YouTube)
The Boiling Water Method
Joe’s approach with boiling PLA was a good proof of concept, but it was only qualitative, his parts were floating in the water, and most importantly, no data was collected (savage).

Boiling PLA for 10 minutes for extra strength. (Source: Joe Mike Terranella, YouTube)
Areas of Improvement
Using water as a heat source is advantageous because it provides fairly uniform heating, but temperature control is fussy to maintain a specific temperature. Ovens are convenient since it provides a (moderately) temperature controlled chamber, but heat transfer from the heating element to the part is less than ideal and still leads to uneven heating.
If only there was a way to combine the temperature control of an oven and uniform, stable heating of a water bath…
Annealing PLA with… Sous Vide?
Yes, that’s right. Sous vide is the ultimate hero of this story.
A while back, I made a sous vide controller to get in on the cooking fad. A few months later and the novelty wore off, but I still had a modular, capable temperature controller ready for its next task (coffee roasting comes to mind, but I digress). In comes my 3D printer, and the combination of cooking and tinkering lead to the idea of performing heat treatment with a kitchen gadget.

DIY sous vide controller hooked up to a kettle.
Ladies and gentlemen, welcome to the meat and potatoes of this post.
To recap, we’ve learned why annealing is desirable to reduce internal stresses (ie. increase crystallization), what previous research has identified, and what current heat treatment processes have already been tried. Although the presented information has helped in answering our preliminary questions, we still have unanswered ones that are left for us to uncover and test.
The Questions
- Will annealing PLA in a temperature controlled water bath improve its mechanical properties?
- What effect does layer height have on annealed parts?
- Do we really need to cool the samples slowly, or can we get away with (quicker) cooling in room temperature?
The Setup
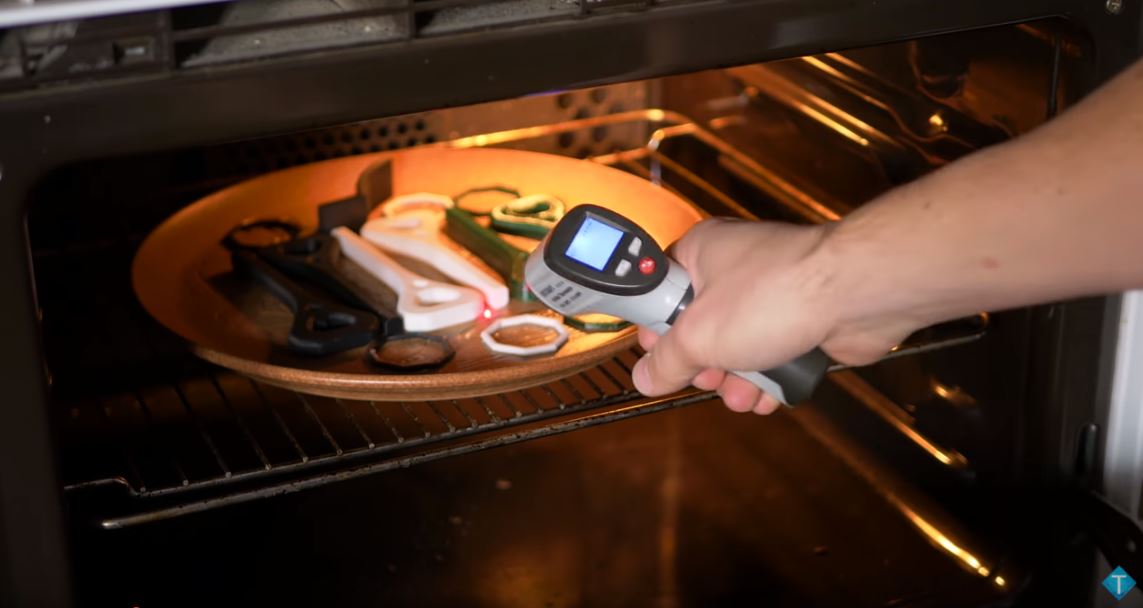
We can learn from Joe’s mistakes by making sure our parts are submerged to reduce any risk of non-uniform heating. I put the samples in a Ziploc bag with a few Canadian pesos to keep them underwater. Two batches of 6 samples each were cooked sous vide, one set at 0.2625 mm layer height and the other at 0.175 mm.

Deprecated pennies were used to keep the samples submerged in the temperature controlled water bath.

Test samples lined up for carnage.
Designing the Tests
Wait, hold the phone: we still have many other questions! What annealing temperature is going to be maintained? How long are the samples going to be annealed for? Why are the samples so small?
All great questions, but unfortunately not all have great answers.
Q: What annealing temperature are we going to maintain?
PLA melts around 180-220°C, and its glass transition temperature is between 60-65°C6. We’re interested in the latter since that’s the temperature where recrystallization occurs. However, lower quality PLA requires higher temperatures due to more impurities in the material. To be safe, we’ll set the temperature to 70°C. According to the graph of crystallinity vs annealing time (a few page scrolls above), we’ll hit the maximum 48-49% crystallinity at around 6 hours.
Q: Wait, 6 hours of annealing time? Are we really going to wait that long?
Ain’t nobody got time for that! I’m an impatient guy, and waiting for my 3D prints to finish is painful enough. If we want to be robust in our test methods, sure we can wait 1/4 of an entire day to extract a bit more performance out of a plastic part. But I’m also a practical guy, so I want to see how little time I can get away with to achieve a meaningful increase in strength. My threshold for this is about 30 minutes; anything longer and I would question if it’s worth it for everyday printing, so we’ll go with that.
Q: Sounds good. But why are the test samples so small? Other people seem to test with much larger parts.
Since we’re applying (what we’ll assume to be) a point force, the sample doesn’t actually need to be that long. In terms of cross-sectional area, wall thickness has a much larger impact on a part’s strength than infill. Thus, these samples were designed to be hollow with a 2.0 mm wall thickness, which is actually a reasonable thickness for standard printed parts. Since those are the criteria that needs to be met, the sample just needs to be big enough to be able to test with (ie. long enough to span the gap). And going back to my impatience, 8 minutes is about the longest I want to wait for these samples since I’ll be printing multiple of these.
The Procedure
Now that that’s out of the way, we can finally start testing and breaking things!
Annealing the Samples
- Print 9 rectangular prisms as the test samples
- Remove 3 samples as the control set (ie. unmodified and directly off the printer)
- Fill kettle with room temperature water
- Submerge the remaining 6 samples in water bath
- Set desired temperature of water bath
- Maintain temperature for 30 mins
- Remove 3 samples (1st sous vide set) and allow to air cool at room temperature
- Turn off heat and allow the remaining 3 samples (2nd sous vide set) to slowly cool with the water bath
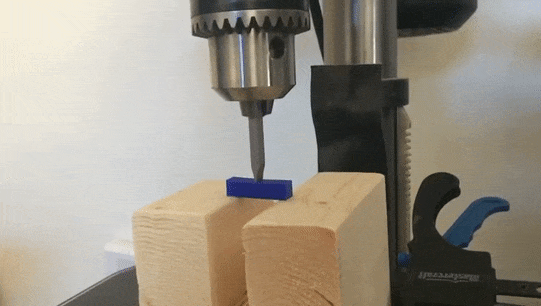
Breaking the Samples
- Place test jig on top of bathroom scale
- Apply vertical point force on the sample
- Record maximum load before sample catastrophically explodes

Overview of test setup. Camera is used to capture the scale measurement at peak force.
The Results
To recap our hypotheses:
- Annealing PLA in a temperature controlled water bath will promote crystallinity (and thus lower internal stress) in comparison with using conventional ovens.
- Samples printed at a 0.175 mm layer height will have higher internal stress than those at 0.2625 mm.
- Samples cooled at room temperature in air will have higher internal stress than samples cooled with the water bath.
The figures below tell the story. However, the results were not 100% as expected! And that’s why we test our assumptions.
Measuring the Maximum Applied Load
For the 0.2625 mm layer height, there was virtually no change between the control and annealed (sous vide, slow/fast cooled) samples. On the other hand, the samples printed at 0.175 mm demonstrated ~53% increase in resistance to shear force when compared with the non-annealed samples.
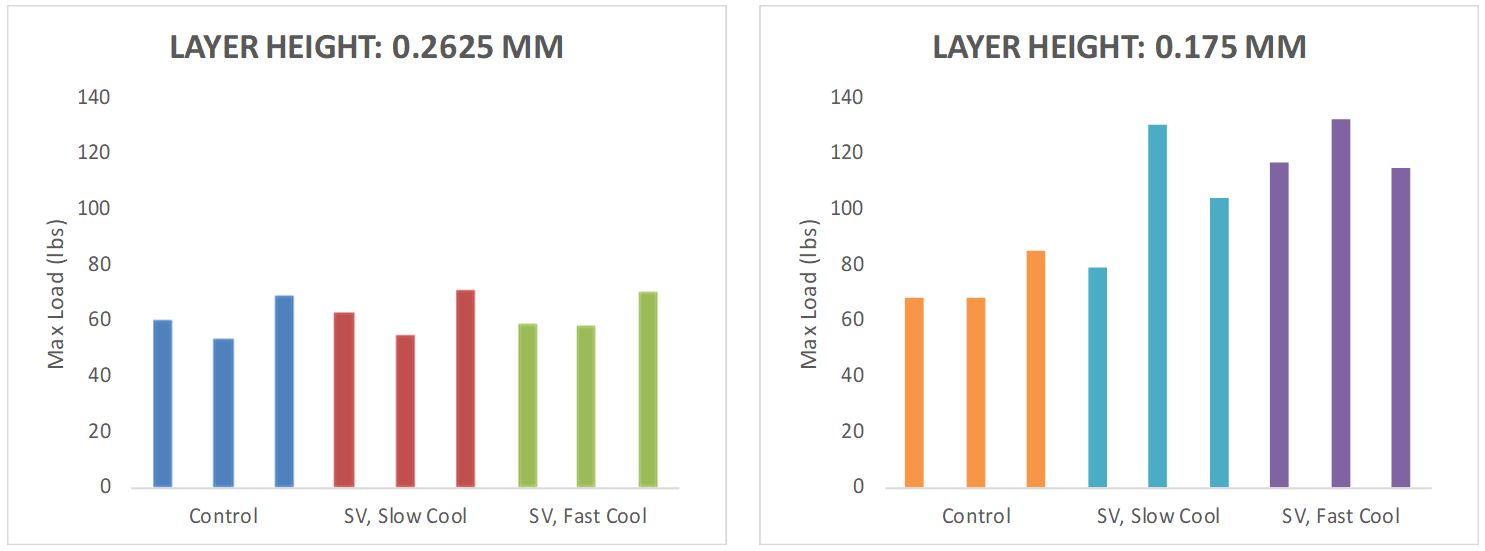
Max applied force before failure at 0.2625 mm and 0.175 mm layer heights.
Averaging the data paints a clearer picture. Interestingly, the sous vide samples when cooled quicker (ie. at room temperature instead of in the water bath) showed a slightly higher maximum force. Granted, three data points is hardly enough information to make any conclusions, but it provides some indication to the characteristic trend of these scenarios.
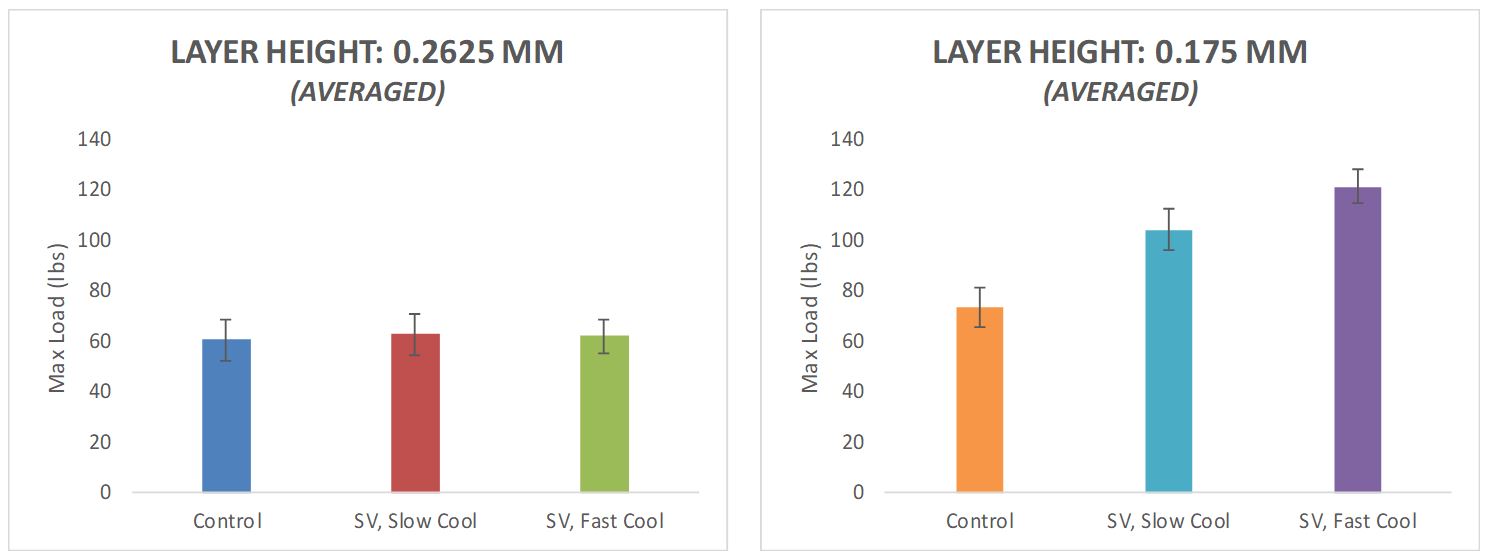
Averaged data with error bars showing standard deviations.
Measuring the Changes in Physical Dimensions
One of the hypothesized benefits of annealing with sous vide instead of in an oven is the uniform temperature control and reduced risk of warping. These parts were small and relatively thick, so warping wouldn’t normally be an issue anyway, but I measured the dimensional changes in the part from heat treatment anyway.
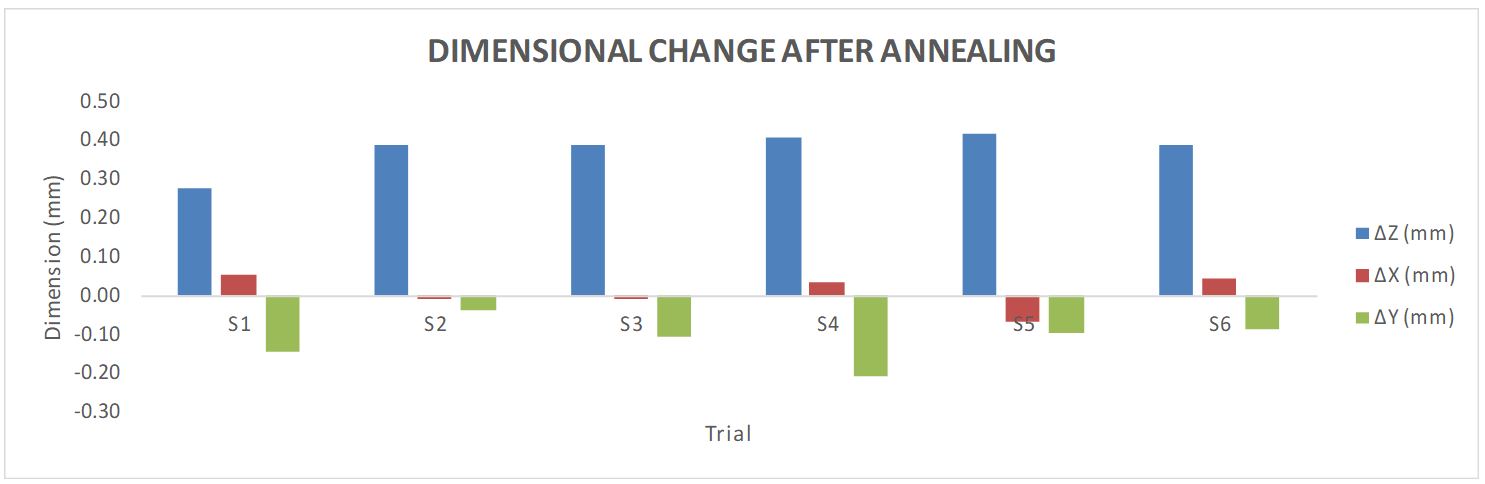
Quantifying the changes in each dimension after annealing.
We see that the Z dimension (ie. the sample height and the longest dimension) increased the most, whereas both expansion and contraction occurred with the X and Y dimensions. However, these changes result in less than 2% dimensional change (and in most cases it was less than 1.5%), which is fairly acceptable for 3D printed parts.
The Discussion
So after all this, what does it all mean? Like it or not, it means we don’t have a conclusive answer (but we can at least still talk about it).
Different Results for Different Layer Heights
This was probably the most unexpected observation. Annealing didn’t seem to have an effect on the samples printed at 0.2625 mm, but it did at 0.175 mm. What gives?
After doing a bit of Googling, other tests have shown that larger layer heights provide greater part strength7. 3D Matter wrote a great article on how layer height, infill percentage, and infill pattern affects the maximum strength of a printed part.

Detailed results showing the stress-strain curves for samples printed at varying layer heights. (Source: 3D Matter)
Their results: test samples printed at 0.3 mm had a maximum stress of about 36 MPa, whereas the samples at 0.1 mm topped out around 29 MPa. Backing up a bit, we can safely say that a part made of solid piece of plastic would be significantly more robust than two pieces of solid plastic bonded together. Since the material itself has imperfections, adding the bonding layer creates another source of imperfection and instability. Extrapolating this to a 3D printed part with hundreds of layers, we can guess that the increase in sources of imperfection will not bode well for the part’s own well being.
So why did only the smaller layer height benefit from annealing? My guess is that the annealing helps massage these imperfections out, so more imperfections means more room for improvement. It’s possible that with the larger layer height, my test sample was too small and short to really benefit from the annealing. That, in addition to the many sources of error in my testing (which I’ll get to later), may be the reason for the lack of improvement in mechanical performance with the 0.2625 mm parts.
Slow Cooling vs Fast Cooling
For annealing to be effective, the material typically needs to be cooled uniformly back to room temperature. If it’s cooled too rapidly, different areas of the part may cool at different rates and cause either warping or internal stress to form. To slowly cool the test samples, they were left in the water bath (with heat turned off) such that the rate of part cooling matched that of the water bath. Since water has a high heat capacity of 4.181 J/g/K (and for comparison, solid aluminum is only 0.897 J/g/K)8, it would reach room temperature at a significantly slower rate than if the parts were just left on the counter (a difference of about < 10 mins versus > 4 hours).
The results suggest that faster cooling yielded a greater improvement in strength over the slow cooling, which goes against the above logic. However, since the test parts were small in size and having low thermal and physical masses, the benefits of slow cooling may not be evident. Additionally, the individual 0.175 mm results for the “SV, Slow Cool” set (in turquoise) had a fairly large spread, so more data should be collected to determine if it’s actually statistically significant from the 0.2625 mm data.
The Sources of Error
During the testing process of breaking the samples, it occurred to me that I was most likely applying the force at different rates. As I got into the rhythm of testing and got a feel for when the samples failed, I likely changed the applied force profile. I would have more confidence in the results if I applied force at the same speed for all trials, but alas human error got the best of me. This was probably the greatest source of error in the testing.
The digital bathroom scale was also not ideal since I don’t know how quickly the measurement actually updates on the screen. Since the event of failure occurs so quickly, I may have easily missed the actual maximum force. This in tandem with the inconsistency in applied force means that I’m unfortunately unable to draw meaningful conclusions from the collected data.
Another source of error includes part to part variation on the same printer, which would be reduced by collecting more data points (ie. more than a measly 3 tests per set). The test piece also may not have been perfectly centered between the two wooden supports, which may also affect the load distribution and thus required breaking force.
Future Work
The silver lining to all of this are the learnings from mistakes. If I were to carry out the tests again, I would change the following:
- Apply the point load at a consistent rate (maybe attach a stepper/DC motor to drive the force down into the sample)
- Use an analog instead of digital scale, or
- Set up a dedicated load sensor in addition to displacement measurement to quantify the stress-strain characteristics
Annealing, PLA, and You
So does this mean annealing is worth the effort? Is sous vide really necessary over a regular oven? Was this just a waste 20 minutes reading an article with inconclusive results?
Maybe, probably, and it depends.
As discussed earlier in this post, annealing plastic has tangible benefits in increasing its mechanical strength. However, plastic (and especially 3D printed plastic) is not the end-all material for home projects. It can only go so far, and sometimes 3D printing may not be the most suitable manufacturing method. Yes, people have printed gearboxes and mechanical vises which are undoubtedly impressive, but sometimes it’s cheaper in material cost and/or time to look at alternative manufacturing methods (or even off-the-shelf components).
Despite sous vide being home in the kitchen, I’m still adamant that it also has a place in heat treatment applications. The benefits of having an easily regulated, uniform temperature controlled environment is advantageous. However, limitations are evident in scaling as it may not be feasible to have a large tank of heated water in industrial settings when an oven may be cheaper and achieve similar results.
As for this excessively long article, the least you can do is learn from my mistakes and apply the knowledge to your own future projects. Hopefully you found it interesting and enjoyable to follow along this technical deep dive, and maybe even learned a thing or two in the process.
Until next time!
References
Annealing (metallurgy), Wikipedia. ↩︎
How to Anneal Your 3D Prints for Strength, 3DSourced. ↩︎
Annealing conditions for injection-molded poly(lactic acid), Plastics Research Online. ↩︎
Bake your PLA and have it outperform everything else!, Thomas Sanladerer. ↩︎
Annealing MakerGeeks Raptor PLA - The Boil Method, Joe Mike Terranella. ↩︎
What is the influence of infill %, layer height, and infill pattern on my 3D prints?, 3D Matter. ↩︎
Heat capacity, Wikipedia. ↩︎